Reasons Behind Trekkers Getting Stranded in Nepal:
First of all, let’s understand the reasons why trekkers can potentially get stranded in high altitude areas of Nepal. Understand that getting stranded doesn’t always mean being lost, it can just be being delayed or cut off temporarily by nature’s unpredictability. The main cause for this is due to sudden weather changes and heavy snowfall or fog which can obscure trails, especially around high altitude passes and during winter season or late autumn.
During monsoon or early spring, there might be landslides or avalanches which can cause trail blockage. These are the main causes of trekkers getting stranded. Besides that, an individual can also lose the trail or have unexpected halts due to acute mountain sickness, communication breakdown, and navigation errors in case of solo trekking.
Step 1: Psychological First Aid (DON’T PANIC):
The natural instinctual human response in a situation like this would be to start panicking. And in the deserted conditions of the Himalayas, panic can be your biggest enemy. At high altitude, your body is already struggling with ‘brain fog’ due to thin air which impairs the cognitive functions of the brain. As a result, you will make poor decisions at a slow speed, which will often be accompanied by anxiety. You need to control this brain fog and give your body and brain some time to process the situation. Understand that being stranded doesn’t mean you’re doomed as Nepal’s trekking regions have strong community rescue networks.
Give yourself some psychological first aid and your mind some reminders of the dedicated rescue and evacuation work done by the rescue systems and local teams, like the ones that are being carried out currently in regions like Everest, Annapurna, Mustang, and more.
Step 2: Stop, Breathe, and Assess:
Embrace the STOP method as soon as you realize that you are stranded. STOP in this case is a method that stands for Stop, Think, Observe, and Plan. This is a non-negotiable step that helps your mind calm down. Immediately stop all movement, don’t rush forward, downhill, or take any risky shortcuts. Sit down at the spot, drink water, and breathe deeply for 60 seconds to lower your heart rate.
Delay any critical decision for at least 15-30 minutes until your mind is clearer. Once you are calm, observe your surroundings including time of day, weather, nearest trail, visible shelters (tea houses, cabins), people, and landmarks. Plan your immediate next action, whether it be staying put, finding a shelter if there is one present nearby, or signaling and trying to reach out for help by communication methods.
Step 3: Stay Put and Shelter:
The big mistake many trekkers make is moving randomly in the hopes of finding help. Do not do this. Stay put until and unless you are sure of the direction or that moving is the safer option. If there is low visibility and you are unsure of your current location and where to move next, staying put is your best bet. Although it might feel like you are just staying idle and not looking for help, this is how you ensure that the help finds you. Search-and-rescue teams, locals, and helicopters look for last-known locations and trails first, which means if you stay close to the trail, it increases your chances of being found. Moving away can put you at more risk.However, in dangerous situations like if your shelter is at risk, you have altitude sickness, or if you can clearly see a teahouse or shelter within safe walking range, move carefully and signal as you go.
Wherever you are, create a shelter like a snow cave/trench, improvised tent, or look for any natural shelters like a big boulder that can protect you from the wind, moisture, and cold.
Step 4: Signal and Communicate:
Once you are sheltered, it is important to find signal and try to establish communication so that help can find you easily. Signaling is not just limited to electrical signals, although that should be the priority.
Attempt a call or SMS to local emergency numbers and your trekking operator periodically. If you have a satellite communication device, send an SOS immediately as it works even when mobile networks fail.
If you are able to connect, send a message following the LAST protocol for maximum clarity:
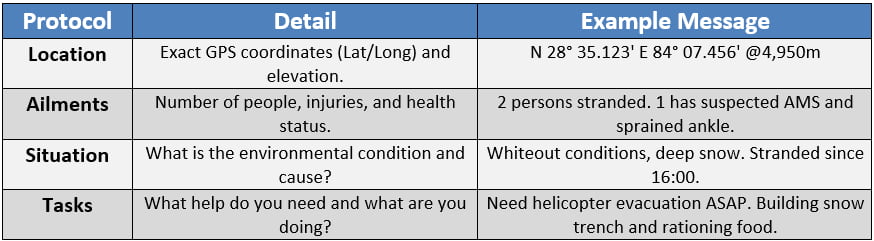
Besides that, you can use other signals. Implement the international distress signal: whistle three short blasts, followed by a one-minute pause, and repeated. This is more effective than shouting. For visual signals, use rocks, brightly colored gear, or dig into the snow, to spell out S.O.S in large letters (at least 15-20 feet long). You can also make fire in an open area and use green leaves or rubber to create thick, dark smoke.
Another form of visual signals is to flash light at a passing aircraft or at a known populated direction by using signaling mirror or a flash light. Three quick flashes is the universal sign for distress.
Step 5: Stay Warm, Hydrated, and Fueled:
While you make attempts to look for help and wait for it, it is important that you keep your body warm, hydrated, and fueled because you are aiming for a long-term survival scenario. Your brain needs glucose and fluids to make clear decisions. You also need to drink at least 3 to 4 liters of water every day to prevent dehydration which can cause altitude sickness.
Now, if you don’t have water source, you can use snow but never eat snow directly as it can lower your core body temperature. Rather, melt the snow using a stove, or simply put the snow in a bottle and keep it in sunlight to melt. Ration whatever food you have into small, equal daily portions that will last at least 2 to 3 days. Eat energy dense food like nuts, dried fruit, chocolate, and energy bars so that your body can generate constant energy.
Step 6: Use Technology Smartly:
Technology is one of the key components of ensuring that you get help in case you are stranded on the trek, and sometimes it also prevents you from getting stuck at all. So, it is important that you use it both wisely and smartly. First of all, download offline maps which work without mobile data so that you can navigate even when signals vanish. You can also set up tracking links with your family or trek operator. However, this will drain the charge of your device pretty quickly. Therefore, you need to carry at least one high capacity power bank and a small solar charger for longer treks.
While using your device for establishing signals, use it in power saving mode and keep it off if you are not using it. Although this is the age of technology, don’t just rely on your phone alone. Carry printed maps, compass, and a charged battery too.
Step 7: Trust Your Guide:
When you set out for a trek, you are the first and most critical responder in case of any emergency. However, you are not alone in this. Your trek operator and your trekking guide are equally worried and are working tiredly to get you out of the situation. Always keep that in mind and trust your guide. At reliable trekking agencies like Beyond the Limits Treks and Expeditions, we hire licensed trekking guides who are trained to act in such emergency situations.
Therefore, they will always ensure your safety, establish communication, and get you rescued as soon as possible. They will know the local procedures, contacts, and the quickest way to notify rescue authorities.
Besides that, even the locals, teahouse owners, and fellow trekkers frequently step in to help in such conditions by sharing shelter, food, and news so you will never feel alone. The mountain safety net is very powerful and ensures community action. Also, you will always be in a group, except in case where you are trekking alone which is highly not recommended and not allowed anymore.
Step 8: Mental Resilience:
You can keep the hunger, cold, and every other feeling at bay and control it. However, the most important thing to keep away is panic as it spreads faster than anything else. Use simple psychological techniques to keep your mind steady. Keep the group’s morale up with light conversation, songs, or a simple game as shared focus on things prevents spiraling fears. Besides that, you can use techniques like box breathing, activating your senses to anchor you in the present, and visualizing coming out of this situation. Tell yourself: “I have tools. I’m visible. Help will come.”
Realated Blogs:
Preparing So You Are Never Stranded While Trekking in Nepal:
As they say, prevention is better than cure. While it can’t guarantee your safety, you will at least be assured that you did everything you could to avoid the situation. Below are some preparation tips to avoid getting stranded:
- Share your full itinerary with your operator and an emergency contact back home.
- Check weather forecasts daily and heed local advice as conditions can change fast.
- Acclimatize properly to reduce the risk of altitude illnesses that can leave you disoriented.
- Carry a small survival kit: emergency blanket, whistle, headlamp, high-calorie snacks, basic first aid, and a water purification method.
- Use licensed guides and registered porters.
- Carry travel insurance that covers high-altitude helicopter rescues and emergency evacuations.

What to Expect When Help Arrives?
When help arrives, and it will, you need to know what to expect. Do not expect individual attention, unless you are injured, as these search and rescue teams are working to help many people like you that are stranded. Follow rescuer instructions, stay warm, and get a medical check for hypoxia, dehydration, or frostbite. Process the entire ordeal once you have reached a safe location and contact your family to inform about your safety and well being. Express gratitude to the local rescuers and to the people who provided you shelter. Once everything is settled, contact your insurer quickly for evacuation and medical claims.
Conclusion
Being stranded in the Himalayas is definitely a stressful possibility. However, don’t let this ‘what if’ hold you back from experiencing the trek of a lifetime as with proper preparation and guidance, you are far more likely to end up on the safe side. At Beyond the Limits Treks and Expeditions, safety is embedded in our itinerary. Our experienced guides carry satellite communication devices, practice evacuation drills, and prioritize acclimatization and weather forecast to make sure your trek ends up as a wonderful memory and not a horror experience.